Setting up the Profile Plug-in
Last Modified: 07-March-2014
This document covers the installation and setup of the profile plug-in (plg_ldap_profile) that can be found in version 2. It is assumed pkg_ldap_plugins has been installed by following the installation in Configuring LDAP Settings.
Jump to:Preparing the Profile
This section demonstrates how to write and maintain the profile XML and Language file(s). This is required to specify fields to display in the profile. A basic understanding of XML syntax is required before proceeding.
It is recommended to inspect the example profiles that include attributes from Active Directory and OpenLDAP schemas.
Profiles support languages - an example of this can be found in the default profile. This is only relevant if the site is multilingual. Note: if a profile uses a language file then the key must not have any spaces and should be unique in Joomla's language parser (i.e. PLG_LDAP_PROFILE_BASIC_LABEL).
The remainder of this section will demonstrate how to build the XML.
The profile XML must have the following as a basis:
<?xml version="1.0" encoding="utf-8"?>
<form>
	<fields name="ldap_profile">
		<!-- Fieldsets and fields will be inserted here -->
	</fields>
</form>
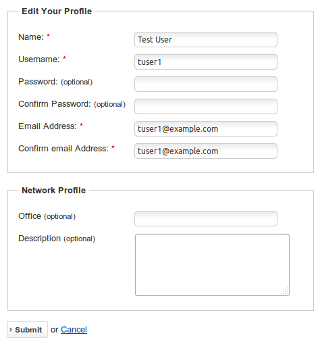
Next, populate the fieldsets and fields (i.e. this is used to replace the fieldsets and fields comment above). A screenshot from the edit profile screen can be seen to the right of the XML:
<fieldset name="network" label="Network Profile">
	<field
		name="physicalDeliveryOfficeName"
		type="text"
		description="Enter the office you work at."
		label="Office"
		size="30"
		filter="string"
		required="false"
		disabled="false"
	/>
	<field
		name="description"
		type="textarea"
		description="Enter your job description."
		label="Description"
		cols="30"
		rows="5"
		filter="safehtml"
		required="false"
		disabled="false"
	/>
</fieldset>
It is possible to have multiple fieldsets to categorise the fields. The following attributes can be used for the field element:
| Key | Description |
|---|---|
| name | This is the LDAP attribute name/key. |
| type | The HTML input text type (e.g. text, textarea, checkbox, password) |
| description | A description of the field (language independent). This can be seen by the user if they hover over the field header. |
| label | The visible name of the field (language independent). |
| filter | The filter to use on the field (e.g. safehtml, tel, string, integer...). |
| required | Make it a required field (i.e. the form won't save until all required fields have been populated). |
| disabled | Allow the field to be edited and saved back to the LDAP directory (note: the current implementation uses the connect username to save back to LDAP). |
| size | The size of the field. |
| cols | Number of columns for the field. |
| rows | Number of rows for the field. |
Make sure the XML looks like the example profiles. Ensure it is saved inside the directory specified by the 'Profile Base' parameter.
Configuring the Plug-in
This section demonstrates the usage for the profile plug-in parameters.
- Open the 'LDAP - Profile' configuration through the Plug-in Manager.
- The following table shows the usage and examples of each parameter in the plug-in:
Key Description / Examples / Usage Sync on Login Synchronise the LDAP profile when a user logs in.
Example: set this to No if the site will use manual synchronisation for profiles only (i.e. using the LDAP Cron script).
Abort Login Abort the user login procedure if the profile fails to synchronise on login.
Allow Push Allows LDAP user profiles to be written to the LDAP server. This setting when set to No will disable all profile pushing to the LDAP server including name and email synchronisation.
Sync Name Synchronise the name field with any of the following options:
- No Sync: no synchronisation will occur.
- Pull Only: uni-directional synchronisation where the name value in Joomla is replaced by the value from LDAP.
- Push and Pull: bi-directional synchronisation where the name value is updated in both Joomla the the LDAP directory.
Examples:
- Set to Pull Only if the user is not allowed to change their name in LDAP (e.g. only administrators change it).
- Set to Push and Pull if the user is allowed to change their name in LDAP.
Sync Email Synchronise the email field with any of the following options:
- No Sync: no synchronisation will occur.
- Pull Only: uni-directional synchronisation where the email value in Joomla is replaced by the value from LDAP.
- Push and Pull: bi-directional synchronisation where the email value is updated in both Joomla and the LDAP directory.
Examples:
- Set to Pull Only if the user is not allowed to change their email in LDAP (e.g. only administrators change it).
- Set to Push and Pull if the user is allowed to change their email in LDAP.
Use Profile This enables the extra profile fields to be shown as specified in the profile XML.
Example: Set to No when only the sync name & sync email fields will be used.
Use Domain Enables multiple profile templates based on the user's domain. Each template XML must be named the same as the domain and located in the 'Profile Base' directory.
This would be used with multiple hosts that use either different attributes and/or users that require different profile fields.
Profile Name Specify the profile name. This is the same name as the XML excluding the file extension. If use domain is set to Yes, the value specified here is used as a default.
Example: If the profile XML is named 'myprofile.xml' then enter myprofile as the value.
Profile Base Specify the full path to the profile base directory. This is where the profile XML(s) are stored.
Examples:
- /etc/joomla/ldap_profile
- c:/mysites/ldap_profile
Permitted Forms List the names of the forms separated by semi-colons where the profile should display.
The default com_users.profile; com_users.registration; com_users.user; com_admin.profile is for inbuilt Joomla forms.
-
Set the plug-in to the Enabled state and click Save.