Configuring SSO Settings
Last Modified: 14-December-2013
This document covers the installation of the SSO add-ons and the configuration of SSO in Joomla. Currently, the SSO core files must be installed with the LDAP core files however, LDAP does not need to be enabled or configured.
Jump to:Installation
Before proceeding, ensure the platform and modules are configured - refer to the Getting Started with Version 2.
- The following extensions are the add-ons for SSO. These can be downloaded from the downloads page:
- plg_sso_http
- plg_sso_edirldap
- plg_sso_dummy
- Log into the back-end / administrator of the Joomla site and go to the Extension Manager.
- Click 'Browse...' then select the downloaded packages from step 1.
- Click 'Upload & Install'. Repeat until all packages listed in step 1 are installed.
- Go to the Plug-in Manager and enable the plug-in 'System - Shmanic Platform'.
If an error is presented, check the Joomla installation is correctly configured (i.e. correct file permissions).
Configuring SSO
This section demonstrates configuring SSO.
- Open the Shmanic Config component (com_shconfig) and click on 'SSO Settings'.
-
Use the following table as a reference for configuring SSO:
Key Description Examples / Usage Authorise User Authorises the SSO username with a user adapter. - Set to Yes if using the LDAP user adapter for example.
- Set to No if SSO users are not authorised or authenticated through a user adapter.
Auto Register Auto registers a user into the Joomla database. This ONLY registers users into the Joomla database. Set to Yes to auto register SSO users. Backend SSO Allows SSO to attempt logon to the Backend / Administrator site. Set to No to force users to re-enter their credentials for the Administrator site. Force Login If user is logged in and detected SSO user does not match, force logout for current user and login of detected SSO user. Set to Yes to prevent users from logging in with other accounts if a SSO user is detected. Bypass URL Key Enter a URL variable name to bypass SSO on either the front or back end. When the passed value of this name is set to 2 then a SSO bypass flag is enabled via a PHP session, else when it is set to 0, SSO is enabled. Set to nosso to use index.php?nosso=2 to bypass SSO. Startup Behaviour This determines the action SSO should take depending on the current Joomla state. Actions: - Set to Always Try to always attempt SSO. This setting is the behaviour used in version 1.
- Set to On Flags to allow SSO bypass flags to be set when either explicitly defined in the URL or when a user logs out from a SSO session. This means SSO will only be attempted when the flag is not set OR if the form task allows it.
- Set to On Demand to only attempt SSO when the form task allows it. This means SSO will never be automatically attempted on startup.
Form Tasks List of login tasks to attempt on-demand SSO. This is not used when the Startup Behaviour is set to Always Try. Valid examples: - user.login
- sso.login
- Once the configuration is completed, click on 'Save'.
- Refer to other documents for setting up the specific SSO plug-ins such as HTTP SSO (plg_sso_http) or eDirectory SSO (plg_sso_edirldap). At least one SSO plug-in is required to achieve SSO.
Debugging SSO
The 'SHLog - SSO' plug-in should be used to log all SSO events when configured to do so.
A "dummy" SSO plug-in (plg_sso_dummy) has been created for the sole purpose of testing the SSO subsystem in either versions of JMapMyLDAP. This plug-in works by manually specifying a username to login using the SSO subsystem.
This plug-in can determine whether there is a problem with a single SSO plug-in or whether the SSO libraries are broken.
Install the plug-in, change the username inside the plug-in's parameters and activate it. Depending how the SSO has been configured, it will use the specified username to attempt SSO.
Example Setup
The following screen shots show an example SSO settings.
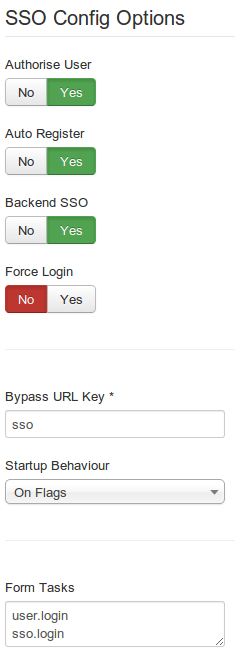 |